8 handgun grip tips: A hands-on primer

Thumb placement on a revolver is necessarily different than a semi-auto, though training incorrectly for one grip can affect the other. (Photo: Eve Flanigan)
Whether your handgun is a revolver or semi-auto, grip is one of the critical components of accuracy and speed. Indeed, most self-taught and new shooters could take their shooting to the next level easily with small changes to their grip habits.
What follows are suggestions for improving grip, and how to identify mistakes or bad habits. Though the pictures feature a right-handed shooter, all of this information applies to handling a gun left-handed as well. Some suggestions are specific to gripping the gun with the shooting hand or the off hand:
1. Get high on the backstrap
Keep the web of your hand high on the backstrap. (Photo: Eve Flanigan)
No, it’s not a reference to a Denver pot-and-venison shop. Make a habit of always grasping the gun—even if you’re just carrying and not shooting it—with the web of your shooting hand as high as possible without overriding the top of the backstrap. Most grips have an indentation, beavertail, textured molding, or some other indicator of the optimal place to put the “V” between your thumb and forefinger.
Why? A proper high-on-the-backstrap grip aligns, as closely as possible, the barrel and the long bones of the forearm. This reduces recoil by minimizing leverage between gun and arm. It maximizes leverage where it’s needed when racking the slide of a semi-auto.
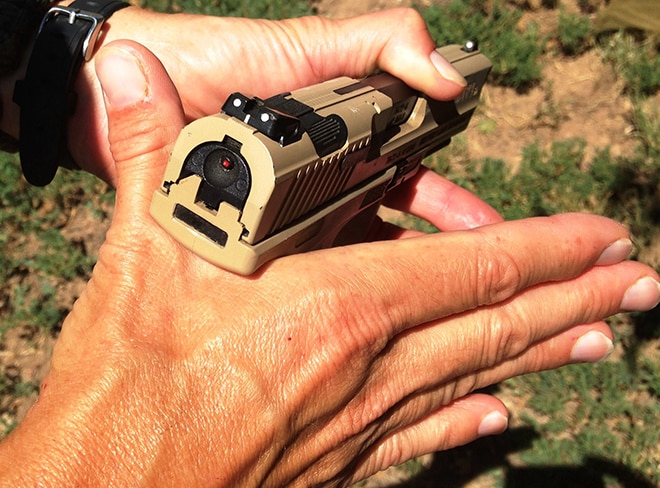
2. Shooting “home base” = trigger finger on frame
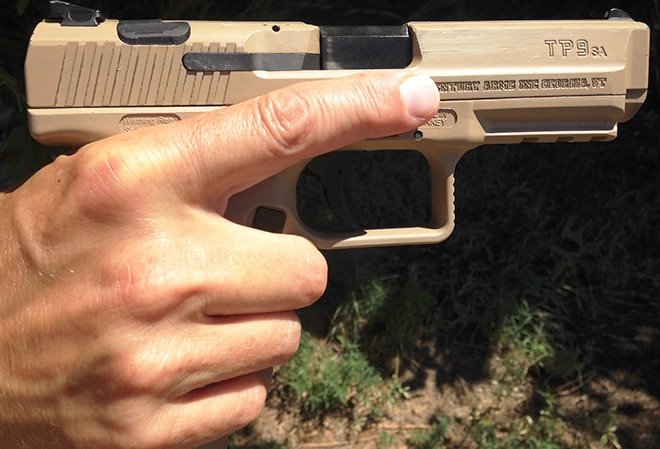
The frame is “home base” for your trigger finger, unless firing. (Photo: Eve Flanigan)
Adopt the habit of keeping your trigger finger straight and on the frame of the gun, not on the grip with the other fingers. Make this position “home base” for your shooting hand, where your finger automatically goes when you’re not shooting.
Why? Most importantly, safety. Keeping your finger on the frame as a habit keeps it outside the trigger guard, preventing unintended discharge. The home-base position also allows the most rapid transition possible from non-shooting to shooting mode.
3. Support “home base” = index finger under trigger guard
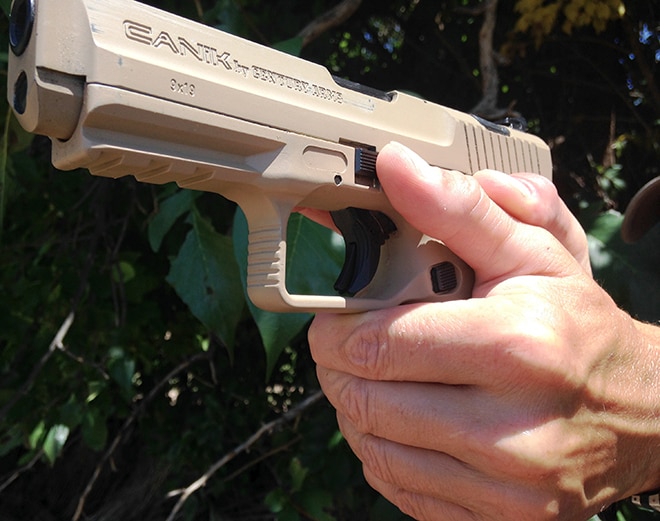
Index finger of the support hand stays in contact with the outside of the trigger guard. (Photo: Eve Flanigan)
Now, add in the support hand grip. Wrap all four fingers of the support hand over the three fingers of the shooting hand, which are already around the grip. The non-shooting index finger stays in contact with the outer, bottom surface of the trigger guard. This should become the “home base” point for that finger. Don’t extend the index finger to the front of the trigger guard, even if the shape of the trigger guard seems to invite “resting” it there. The support hand has a job, and that job is not to rest. Keep the fingers together, not webbed apart.
Why? In short, recoil management. Stacking the strong fingers and placing the support hand high, index finger under trigger guard, absorbs much more recoil than any other configuration.

Stack, don’t spread, support hand fingers. (Photo: Eve Flanigan)
Notice I didn’t say what part of your index finger should be in touch with the trigger guard. That depends upon the unique fit of your hands with any given handgun. Ideally, no grip should be visible between your hands—in other words, if you can see grip, rotate your support hand around the grip (counterclockwise, for right-handed people, clockwise if you’re left-handed), until the heels of the hands are touching.
There are two exceptions to this rule: if the gun is too big and the shooter’s trigger finger cannot reach the trigger when the “V” is formed by the thumb and forefinger, the shooting hand must be rotated toward the trigger. This will sometimes leave a small gap between the hands. The other exception is for 1911 shooters. Correct placement of the shooting-hand thumb over the slide safety will leave a small gap between it and the support hand thumb.

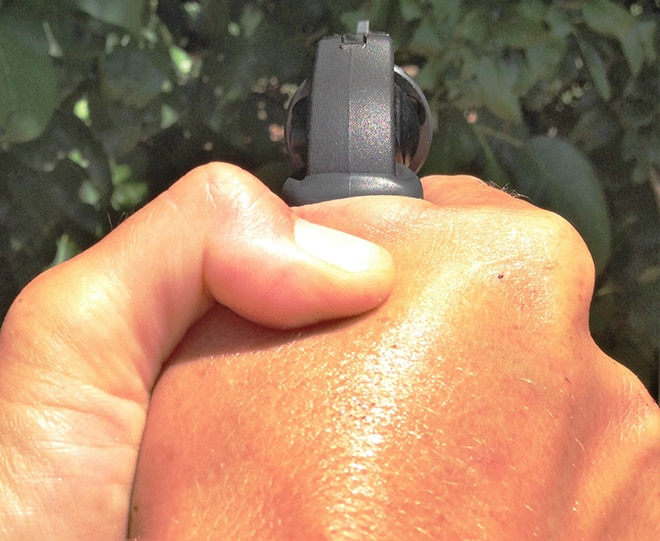
Recommended thumb configuration for revolver for optimal control and operator safety. (Photo: Eve Flanigan)
4. Do thumb thing right
There will be some readers here who disagree with the advice to follow, and that’s okay. I’ve worked with many excellent shooters who use outmoded or personally adapted thumb positions (including one guy who’s missing a thumb, featured in this article). The techniques described here are the current state of our art for safety, accuracy and speed. Many people have compensated for less-than-optimal thumb position with concentrated practice.
Alternate, old-fashioned revolver grip. Not recommended for people who switch between action types! (Photo: Eve Flanigan)
Revolver
Optimal thumb placement is with the support hand thumb anchored over the other by folding the most distal knuckles over each other. An old-fashioned alternative is to rest the support hand thumb in the fleshy “V” between the thumb and forefinger of the shooting hand. I don’t recommend this alternative as it results in reduced recoil control and, for beginners or those who frequently move from revolver to semi-auto and back during practice, it results in a painful, bloody experience if you forget and place your thumb behind a semi-auto.

Optimal semi-auto thumb configuration offers better recoil control. (Photo: Eve Flanigan)
Semi-auto
Nest the bottom knuckle of the support hand thumb under the same joint of the firing hand. Rest both thumbs against the frame, pointing in the general direction of the target. This is the grip that you will see most competition and other elite shooters using (or some hybrid) simply because it is the most recoil friendly grip we’ve figured out yet.

Folded thumbs on a semi-auto are a relic of the transition from revolvers. It works, but not as well as straight thumbs. (Photo: Eve Flanigan)
While many shooters prefer the folded-thumb position as described for revolvers above, the thumbs-forward grip puts the most flesh possible against the gun—thus contributing to recoil management, including confining it to a straight, vertical motion. And no, your thumbs won’t get pinched in the slide, so don’t point them perpendicular, away from the gun, in fear of pain.
5. Avoid these common support hand errors
New shooters can do some crazy things with their support hands when gripping a handgun. Here are a few less crazy things I’ve seen shooters do, that despite being more sane, still impede speed, accuracy and consistency.

Angelina Jolie shows a major teacupping error. (imfdb.org)
Strong finger on trigger guard
Many self-taught shooters have a habit of placing the non-shooting index finger in front of the trigger guard. At worst, this is a safety issue in a stressful situation. I’ve seen many shooters unconsciously move their finger from in front of the trigger guard to inside of it. This usually happens with even a small increase in the intensity of training in a controlled environment.
It doesn’t take a genius to see that this may represent a major risk of unintended discharge in an actual defensive encounter. This errant habit also puts a strong finger in the weak, greater-than-90-degrees position in which it can’t assist in recoil management.

Even a little teacupping compromises control of the gun. (Photo: Eve Flanigan)
Teacupping
Are you shooting, or waiting tables at Buckingham Palace? Placing the support hand too low compromises recoil control. While the photo shows an extreme example, any lowering of the support-hand index finger away from “home base” compensates recoil management. A proper grip can be painful after repeated firing of some revolvers. Wrap the index finger with cloth tape or wear a glove for more comfortable practice.
Grasping the wrist or forearm of the firing hand with the support hand

Don’t grab your own arm. (imfdb.org)
Dirty Harry did it, but that doesn’t make it right. Unless you’re stabilizing a broken wrist or arm, or being coached by a Hollywood director who doesn’t know any better, don’t do this.
6. Gun’s too big?
Anyone, with sufficient determination, can shoot with accuracy virtually any handgun, even one that’s too large. As an average-size female, I can attest that there are very few full-size handguns that offer a textbook fit for my hand, yet that doesn’t stop me from enjoying them.
Good grip is the ace card when compensating for an imperfect fit. There are lots of great articles available about selecting a gun, so for now we’ll leave that discussion alone.
7. Gun’s too small?

Avoid gaps between the heels of your hands. (Photo: Eve Flanigan)
On the other end of the spectrum, most shooters find it distracting when the little finger dangles below the grip of a small concealment gun. A typical compensation is to slide one or both hands downward so the pinky isn’t all alone.
Recognize the dangling pinky condition for what it is—a minor annoyance. Don’t sacrifice control of the gun by moving either hand down. The strong fingers are part of recoil management—and most folks find it surprising that smaller guns typically transfer more recoil to the shooter. Don’t give in to the temptation to alleviate “pinky distraction” in any way other than ignoring it.
8. Put it all together

Straight, locked wrist and elbow joints offer better control and prevent misfeeds, even with a small gun. (Photo: Eve Flanigan)
It’s been described earlier, but bears repeating: the heels of your hands should be mashed together so as to cover as much of the grip as possible, and thus prevent wagging of the firearm in recoil. This is best accomplished not by tension in the hands or shoulders, places where new shooters commonly, and mistakenly, tense up, but by exerting a push toward the target with the firing and an equal pull toward the shooter’s sternum (or center of stance if shooting from an asymmetrical position). The power of this push/pull comes from the shooter’s pectoral region; some do best applying the “core” of their body to this effort. It should be comfortable and not tiring.

Wuss arms = poor shooting + malfunctions. (Photo: Eve Flanigan)
Proper stance contributes to a solid grip, particularly for new shooters. With a good stance, it’s easy to “lock” the wrists into place, applying even pressure that comes from the center of the arms. This is important especially for the firing hand, which should press evenly on the grip, not “heeling” the gun by exerting upward pressure.
Firm wrists and, to whatever extent is comfortable, straight and locked elbows, contribute to accuracy by placing the gun in the same position every time. This prevents malfunctions in a semi-auto as well, as the slide requires opposing pressure to cycle properly. It has been my experience that many new shooters, especially females, hesitate to aggressively lock their arm joints. This often results in frustration as soft arms invite both malfunctions and exaggerated recoil.
Final thoughts
Self-taught and beginner shooters can easily improve accuracy and speed by applying the techniques described here, odd as some may feel to hands that are ingrained to old habits or eyes that have seen too many bad examples from Hollywood. Experiment safely, including dry firing, before trying any new technique at accelerated speed.
Read More On:
Latest Reviews
-
The Baby Glock Centimeter: A Review of the New G29 Gen 5 10mm Carry Pistol
Whether straying into the backcountry or just a fan of the 10mm Auto, Glock has long had one of the smallest carry guns offered in that caliber and we have been kicking around its latest variant for a couple of months.
Read More -
AMT Backup .380 Review: Fun With a Retro Pocket Pistol
I’m rather fascinated with pocket guns, so when I came across this AMT Backup 380 in Guns.com's Certified Used stockpile, I had to give it a try. It's an interesting and affordable retro pistol.
Read More -
Winchester Model 100 in .243 Win Stands the Test of Time
Every now and then I happen upon a neat little rifle I’ve never heard of, like this Winchester Model 100. Let's see if this mid-century deer hunter chambered in .243 Winchester still has what it takes.
Read More -
Palm Full of Parabellum: A Review of the 9mm Bond Arms Stubby
Texas-based Bond Arms, the country's go-to maker of double-barreled derringer-style handguns in usable calibers, recently introduced an ultra-compact new 9mm-- the aptly named Stubby.
Read More
